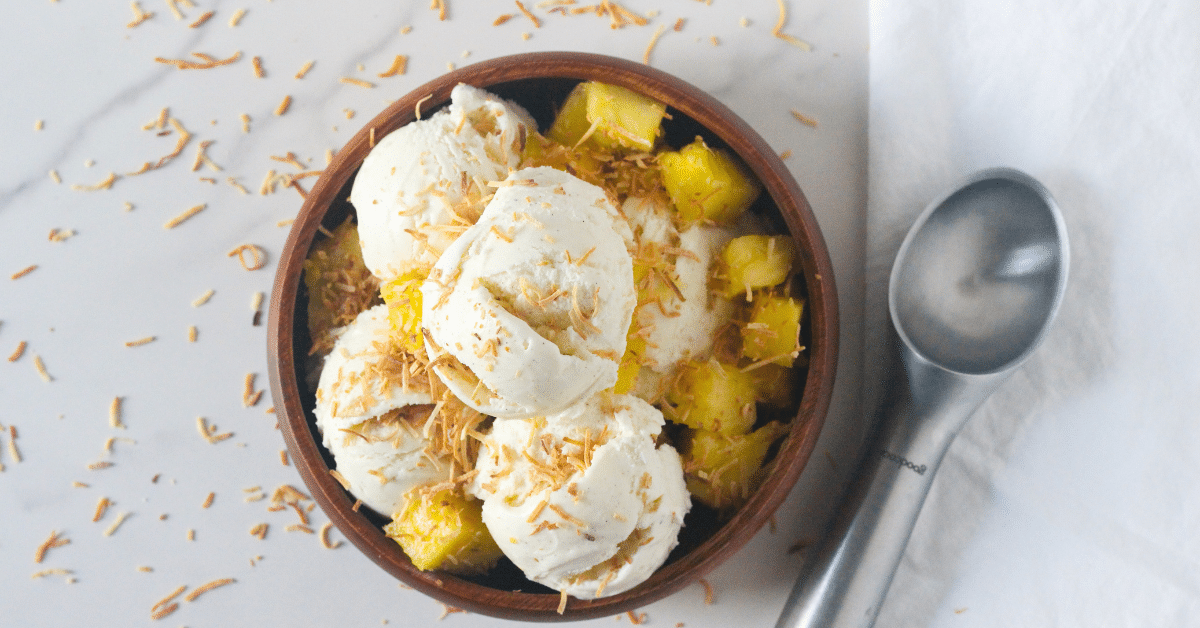
Imagine a sun-drenched beach, the gentle lapping of waves, and the irresistible aroma of toasted coconut mingling with sweet, tangy pineapple. Now, capture that idyllic scene and transform it into a creamy, dreamy frozen dessert. That's the magic of toasted coconut piña colada ice cream – a vibrant, utterly delicious treat that transports your taste buds straight to paradise with every spoonful.
Far from just another ice cream flavor, this tropical concoction is an experience. It’s a sophisticated twist on the classic tropical cocktail, taking its iconic flavors of coconut cream and pineapple juice and embedding them in a luxurious, frosty base. But the real game-changer? The toasted coconut. This simple addition elevates the entire profile, adding a depth of flavor, a delightful nuttiness, and a subtle textural contrast that makes this ice cream truly unforgettable.
The Allure of Toasted Coconut Piña Colada Ice Cream
What makes toasted coconut piña colada ice cream such an irresistible delight? It’s a symphony of textures and tastes that awakens the senses. At its core, the ice cream embodies the spirit of the piña colada – creamy, sweet, and bursting with the bright, acidic notes of pineapple. The rich, velvety texture of the ice cream base, often made with full-fat coconut milk or cream, provides a canvas for these bold flavors.
The addition of pineapple is crucial, bringing a refreshing zest that cuts through the creaminess. Whether you opt for fresh, perfectly ripe pineapple or high-quality canned crushed pineapple, its sweet-tart essence is undeniable. But it’s the toasted coconut that truly sets this particular ice cream apart. While regular coconut flakes offer a pleasant chew and mild flavor, toasting them unlocks a whole new dimension. It brings out a deeper, more complex nutty flavor and a wonderful aroma that is both comforting and exotic.
This isn't just a dessert; it's a celebration. It’s perfect for summer gatherings, backyard barbecues, or simply as a luxurious personal indulgence on a warm evening. Its vibrant character makes it a fantastic conversation starter and a guaranteed crowd-pleaser. The balance of creamy, sweet, tangy, and nutty elements ensures that each bite is a journey through a tropical flavor landscape.
Crafting Your Tropical Masterpiece: Key Ingredients & Techniques
Creating your own batch of delicious toasted coconut piña colada ice cream at home is a rewarding experience. The process, while requiring a few steps, is incredibly satisfying, and the results are far superior to most store-bought alternatives. The key to a truly outstanding ice cream lies in both the quality of your ingredients and the careful execution of a few simple techniques.
Essential Ingredients for Success:
- Full-Fat Coconut Milk/Cream: This is the foundation of your ice cream, providing unparalleled creaminess and that signature coconut flavor. Look for brands with high coconut extract content for the best results.
- Pineapple: Fresh pineapple, pureed or finely diced, offers the most vibrant flavor. Canned crushed pineapple, drained well, is a convenient and still delicious alternative.
- Sweetener: Granulated sugar is standard, but you might also consider a touch of condensed milk for extra richness and a smoother texture.
- Shredded Coconut: Unsweetened shredded or flaked coconut is ideal for toasting. Sweetened can work but be mindful of overall sugar content.
- Rum (Optional, but Recommended): A splash of white or dark rum (or even a coconut rum) isn't just for flavor; alcohol helps keep the ice cream softer and prevents it from freezing rock-solid. Don't worry, the alcohol content is minimal once churned and frozen.
- Vanilla Extract: A touch of vanilla can surprisingly enhance and round out the tropical flavors.
- Pinch of Salt: Essential for balancing sweetness and enhancing all other flavors.
The process generally involves combining your base ingredients, chilling the mixture thoroughly, churning it in an ice cream maker, and then folding in your perfectly toasted coconut. For those looking for a detailed guide, our article, Easy Toasted Coconut Piña Colada Ice Cream Recipe, offers step-by-step instructions to ensure your success. Remember, patience is a virtue, especially during the chilling and freezing stages.
Why Toasted Coconut? Elevating the Flavor Profile
You might wonder, why bother toasting the coconut? Isn't plain coconut enough? The answer is a resounding "no" if you're aiming for truly exceptional toasted coconut piña colada ice cream. Toasting coconut is a simple step that yields profound results, transforming a good dessert into an extraordinary one.
When you toast shredded coconut, you initiate a Maillard reaction, a complex chemical process that creates hundreds of new flavor compounds. This process deepens the coconut's natural sweetness and introduces rich, nutty, almost caramel-like notes that are absent in untoasted coconut. The aroma alone is intoxicating – warm, inviting, and wonderfully fragrant. It moves beyond a simple coconut flavor to something more sophisticated and complex.
Furthermore, toasting adds a slight crispness to the coconut flakes. When folded into the ice cream, this provides a subtle textural contrast to the otherwise smooth and creamy base. It's a delightful little chew that keeps each spoonful interesting. This depth of flavor and textural dimension beautifully complements the bright pineapple and rich coconut cream, creating a more harmonious and multi-layered sensory experience. Toasted coconut is not just an add-in; it's a flavor enhancer, a crucial component that defines this particular ice cream and sets it apart from a standard piña colada variation.
Tips for Perfect Toasting:
- Stovetop Method: Heat a dry skillet over medium-low heat. Add shredded coconut and stir constantly until golden brown. This method requires constant attention as coconut can burn quickly.
- Oven Method: Spread coconut in a single layer on a baking sheet. Bake at 300°F (150°C) for 5-10 minutes, stirring every couple of minutes, until golden.
- Watch Closely: Coconut goes from perfectly golden to burnt in a flash. Don't walk away!
- Cool Completely: Allow the toasted coconut to cool completely before adding it to the ice cream mixture. This prevents it from warming the ice cream base and helps maintain its crispness.
Serving Suggestions & Perfect Pairings
Once you’ve perfected your batch of toasted coconut piña colada ice cream, the next step is to serve it in a way that maximizes its appeal. This tropical treat is versatile and can be enjoyed in many delightful ways.
Garnishing for Impact:
- Extra Toasted Coconut: A sprinkle of freshly toasted coconut on top enhances both flavor and visual appeal.
- Fresh Pineapple: A small wedge or a few finely diced pieces of fresh pineapple add a pop of color and fresh fruitiness.
- Maraschino Cherry: For that classic piña colada look, a bright red cherry is a must.
- Mint Sprig: A fresh mint sprig adds a touch of elegance and a refreshing aroma.
- Rum Drizzle: For an adult twist, a light drizzle of dark rum or coconut rum just before serving can be divine.
Perfect Pairings:
This ice cream isn't just a standalone dessert; it pairs wonderfully with other flavors and dishes:
- Tropical Fruit Salad: Serve a scoop alongside a medley of mango, papaya, kiwi, and passion fruit for a truly exotic dessert.
- Shortbread Cookies: The buttery richness of a shortbread cookie provides a lovely contrast to the creamy, fruity ice cream.
- Grilled Pineapple: For an intensified pineapple experience, serve with warm, caramelized grilled pineapple slices.
- Lime Meringue Pie: The tartness of lime complements the sweet, tropical notes of the ice cream beautifully.
- Light Cakes: A simple pound cake or angel food cake makes an excellent, un-fussy base for a scoop of this ice cream.
Consider serving it as the grand finale to a casual backyard BBQ or as a refreshing interlude during a more formal summer meal. The vibrant flavors make it suitable for almost any occasion that calls for a touch of tropical flair.
Tips for the Ultimate Toasted Coconut Piña Colada Ice Cream Experience
To ensure every scoop of your homemade toasted coconut piña colada ice cream is nothing short of perfect, keep these expert tips in mind. From preparation to storage, these insights will help you achieve a consistently creamy, flavorful, and utterly delightful frozen dessert.
- Chill Your Base Thoroughly: This is perhaps the most crucial step for creamy ice cream. The colder your base mixture is before churning, the smaller the ice crystals will be, resulting in a smoother, less icy texture. Aim for at least 4 hours, or preferably overnight, in the refrigerator.
- Don't Overfill Your Machine: Ice cream makers need space for the mixture to expand as it churns and incorporates air. Overfilling can lead to an uneven freeze and can even damage your machine. Consult your ice cream maker's manual for capacity guidelines.
- Ripen in the Freezer: While freshly churned ice cream is delicious (and often called "soft serve"), it needs a few more hours in the freezer to firm up to the ideal scoopable consistency. This "ripening" period allows the flavors to meld further and the texture to fully set.
- Consider the Rum: If using rum, a little goes a long way. Too much alcohol will prevent the ice cream from freezing properly. A tablespoon or two per batch usually suffices to impart flavor and improve texture without inhibiting freezing. You can also use rum extract for flavor without the alcohol.
- Adjust Sweetness to Taste: The sweetness of pineapple can vary. Taste your base mixture before churning and adjust the sugar if necessary. Remember, flavors mellow when frozen, so it should taste slightly sweeter than you'd prefer before churning.
- Proper Storage is Key: Store your ice cream in an airtight container to prevent freezer burn and the absorption of other freezer odors. Press a piece of parchment paper or plastic wrap directly onto the surface of the ice cream before sealing the lid to create an extra barrier against ice crystals.
- Let it Soften Slightly Before Serving: For the best texture, remove your ice cream from the freezer 5-10 minutes before serving. This allows it to soften slightly, making it easier to scoop and enhancing its creamy mouthfeel.
- Experiment with Add-ins: Beyond toasted coconut, consider a swirl of pineapple jam, a handful of macadamia nuts, or even a drizzle of coconut caramel sauce right before serving for an extra layer of indulgence.
Achieving the perfect texture and flavor for your homemade ice cream takes a little practice, but with these tips, you'll be well on your way to a consistently delightful dessert. For more in-depth knowledge on perfecting your technique, be sure to check out our Secrets to Perfect Toasted Coconut Piña Colada Ice Cream guide.
In conclusion, toasted coconut piña colada ice cream is more than just a sweet treat; it's a culinary escape. It combines the nostalgic joy of a classic tropical drink with the comforting indulgence of homemade ice cream, all elevated by the nutty, aromatic complexity of toasted coconut. Whether you're a seasoned ice cream maker or a curious beginner, embarking on this delightful project promises a reward of unparalleled tropical bliss. So, gather your ingredients, fire up your ice cream maker, and prepare to be transported to your very own sunny paradise, one creamy, flavorful scoop at a time.
