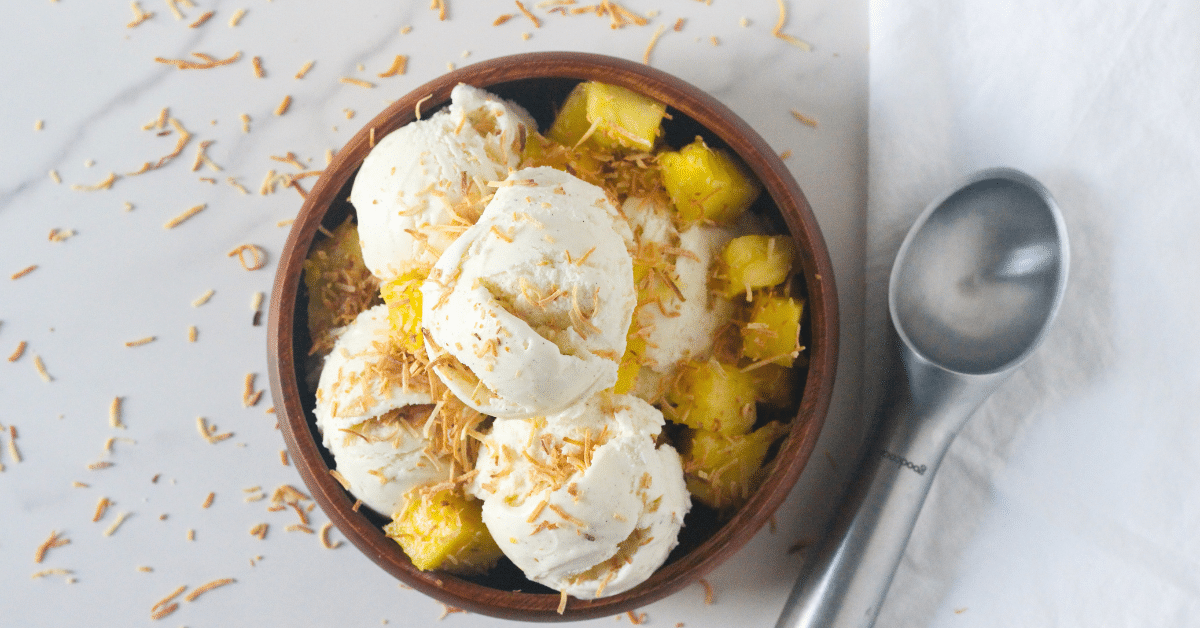
Imagine the sun-drenched beaches of the Caribbean, the gentle sway of palm trees, and the refreshing taste of a classic piña colada – all transformed into a decadent, creamy frozen dessert. If that sounds like a dream, prepare to wake up to reality with our incredible, easy toasted coconut piña colada ice cream recipe. This isn't just any ice cream; it's a tropical escape in every spoonful, blending the rich nuttiness of perfectly toasted coconut with the sweet, tangy burst of pineapple and the creamy indulgence of a traditional piña colada. Forget store-bought pints; once you taste this homemade delight, your dessert game will be forever changed. We're about to show you how effortlessly you can create this exotic treat right in your own kitchen.
Why Toasted Coconut Piña Colada Ice Cream is Your Next Obsession
There's something uniquely captivating about the combination of coconut and pineapple, a duo that instantly transports you to a paradise island. But elevate that with the deep, caramelized notes of *toasted* coconut, and you enter a whole new dimension of flavor. This isn't just about combining ingredients; it's about crafting an experience. The process of toasting the coconut unlocks a profound depth, transforming its subtle sweetness into something robust and irresistible, which then harmonizes perfectly with the bright, acidic sweetness of pineapple and the creamy, luxurious base of the ice cream. This easy toasted coconut piña colada ice cream offers:
- Unmatched Flavor Complexity: The toasted coconut adds a nutty, slightly smoky counterpoint to the vibrant pineapple and creamy base.
- A Taste of the Tropics: It’s a perfect dessert for summer gatherings, backyard BBQs, or simply when you crave a little bit of sunshine.
- Versatility: Enjoy it on its own, serve it with fresh fruit, or even as a unique topping for other desserts.
- Satisfying Texture: Creamy, smooth, yet with delightful hints of chewy toasted coconut flakes throughout.
For those looking to dive deeper into what makes this dessert so special, you might enjoy reading about its rich, tropical origins and how it became such a beloved treat in our article, Tropical Bliss: Toasted Coconut Piña Colada Ice Cream.
Gather Your Tropical Arsenal: Ingredients You'll Need
Creating this spectacular toasted coconut piña colada ice cream starts with selecting the right ingredients. Quality matters here, especially when it comes to your coconut and pineapple. While the recipe is easy, using fresh, vibrant components will elevate your final product from good to unforgettable.
Essential Ingredients:
- Unsweetened Shredded Coconut (1 ½ cups): The star of the show! We'll be toasting this to perfection.
- Canned Crushed Pineapple (15 oz can, unsweetened or in its own juice): Drained well. Using crushed pineapple ensures even distribution and intense flavor.
- Full-Fat Coconut Milk (13.5 oz can): Essential for that authentic coconut creaminess. Chill this in the fridge overnight so the cream separates.
- Sweetened Condensed Milk (14 oz can): Adds sweetness and helps create an incredibly smooth, scoopable texture.
- Heavy Cream (2 cups): The foundation for a rich, luxurious ice cream base.
- White Rum (2-4 tablespoons, optional): A splash of rum enhances the piña colada flavor. Adjust to your preference or omit for an alcohol-free version.
- Vanilla Extract (1 teaspoon): A touch to round out the flavors.
- Pinch of Salt: Balances the sweetness and brings out other flavors.
Quick Tip on Pineapple:
While fresh pineapple purée can be used, crushed canned pineapple is often preferred for ice cream as it has a more concentrated flavor and less water content, preventing an icy texture. Just be sure to drain it thoroughly!
Crafting Your Creamy Dream: Step-by-Step Recipe Guide
Now for the fun part! Follow these simple steps to make your very own luscious toasted coconut piña colada ice cream. An ice cream maker is highly recommended for the best texture, but we'll also touch upon a no-churn option in our tips section.
- Toast the Coconut: Preheat your oven to 325°F (160°C). Spread the unsweetened shredded coconut in a single layer on a baking sheet. Bake for 5-10 minutes, stirring every 2-3 minutes, until golden brown and fragrant. Watch it carefully, as coconut can burn quickly! Once toasted, immediately remove from the hot tray and let it cool completely. This step is crucial for developing that deep, nutty flavor that defines this dessert.
- Prepare the Pineapple: If not already crushed, purée your drained pineapple chunks in a food processor until smooth. If using canned crushed pineapple, simply ensure it's well-drained.
- Combine Wet Ingredients (and Chill): In a large bowl, whisk together the chilled full-fat coconut milk (scrape out the thick cream from the top of the can first), sweetened condensed milk, heavy cream, white rum (if using), vanilla extract, and a pinch of salt until smooth and well combined. This is your ice cream base. Cover the bowl and refrigerigate for at least 2-4 hours, or preferably overnight. A well-chilled base churns faster and results in a smoother ice cream.
- Churn the Ice Cream: Pour the chilled mixture into your ice cream maker and churn according to the manufacturer's instructions. This typically takes 20-30 minutes, until the mixture has the consistency of soft-serve ice cream.
- Fold in the Toasted Coconut & Pineapple: During the last 5 minutes of churning, or immediately after, gently fold in about 1 cup of the cooled toasted coconut and the prepared pineapple. Save the remaining ½ cup of toasted coconut for garnish.
- Final Freeze (Ripening): Transfer the soft ice cream mixture to an airtight container. Press a piece of parchment paper directly onto the surface of the ice cream to prevent ice crystals from forming, then seal the container. Freeze for at least 4-6 hours, or until firm enough to scoop.
And there you have it! Your very own homemade toasted coconut piña colada ice cream, ready to whisk you away to a tropical paradise. For even more detailed insights and pro-level adjustments to perfect your batch, be sure to check out Secrets to Perfect Toasted Coconut Piña Colada Ice Cream.
Mastering the Art of Toasted Coconut Piña Colada Ice Cream: Pro Tips & Variations
While the basic recipe is straightforward, a few expert tips can elevate your homemade toasted coconut piña colada ice cream from delicious to absolutely sublime. Experiment with these suggestions to tailor the treat to your exact preferences.
Achieving the Perfect Toasted Coconut Flavor
- Don't Rush the Toasting: Low and slow is the key to evenly browned, deeply flavorful coconut. Keep an eye on it; coconut can go from perfectly golden to burnt in seconds.
- Stovetop Method: If you prefer, toast coconut in a dry skillet over medium-low heat, stirring constantly until golden. This method requires even more vigilance but can be quicker for smaller batches.
- Cool Completely: Ensure your toasted coconut is completely cool before folding it into the ice cream. Warm coconut can melt the ice cream base and affect the texture.
Alcohol Content and Freezing
- Rum & Texture: Alcohol lowers the freezing point, making ice cream softer and less icy. 2-4 tablespoons of rum is usually a good balance. If you want a firmer ice cream, reduce the rum or omit it entirely. For a stronger rum flavor without added alcohol, a few drops of rum extract can be used.
- No-Churn Option: Don't have an ice cream maker? You can still make this! Whip the heavy cream until soft peaks form. Gently fold in the sweetened condensed milk, coconut milk, rum (if using), vanilla, salt, pineapple, and toasted coconut. Pour into an airtight container and freeze for at least 6 hours, stirring vigorously every 2 hours for the first 4-6 hours to break up ice crystals.
Serving Suggestions and Garnishes
Make your toasted coconut piña colada ice cream even more appealing with these presentation ideas:
- Serve in chilled bowls or glasses.
- Garnish with extra toasted coconut flakes, a fresh pineapple wedge, a maraschino cherry, or a sprig of mint.
- Consider serving alongside shortbread cookies or fresh tropical fruit salad.
Storage and Longevity
- Airtight is Key: Always store your homemade ice cream in a freezer-safe, airtight container to prevent freezer burn and the formation of ice crystals.
- Press & Seal: For extra protection, place a piece of plastic wrap or parchment paper directly on the surface of the ice cream before sealing the lid.
- Enjoy Fresh: While it will last for a couple of weeks, homemade ice cream is best enjoyed within the first week for optimal texture and flavor.
This recipe for easy toasted coconut piña colada ice cream is more than just a dessert; it's an invitation to a tropical escape, a burst of sunshine on a spoon. With its creamy texture, vibrant pineapple tang, and the irresistible crunch of deeply toasted coconut, it promises a memorable culinary experience. Whether you're hosting a summer gathering, craving a taste of the tropics, or simply want to impress your family and friends with a unique homemade treat, this recipe delivers on all fronts. So, grab your ingredients, fire up your ice cream maker, and get ready to indulge in a truly spectacular frozen delight that will have everyone asking for more. Enjoy your journey to flavor paradise!
